Mastering Wildlife Design: A Practical Guide to Antler Vector and PS Brushes
There is a distinct satisfaction in finding the perfect graphic element that ties a design together. Whether you are crafting a logo for an outdoor brand, designing a wedding invitation with a rustic theme, or creating marketing materials for a hunting lodge, the details matter immensely. This is where Antler Vector and PS Brushes come into play. These tools offer a bridge between rugged, natural aesthetics and clean, professional digital execution. However, simply downloading a pack of assets does not guarantee a great result. Many creators, from seasoned professionals to enthusiastic hobbyists, often stumble over the same pitfalls when integrating these specific resources into their workflows. By understanding the nuances of vector scalability versus raster texture, you can avoid common frustrations and elevate the quality of your final output.
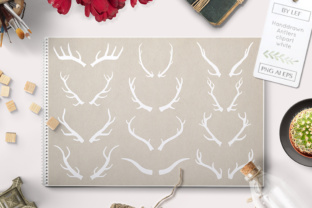
The core appeal of this collection lies in its versatility and ethical origin. As the download details proudly state, no deer were harmed during the making of this clipart. Instead, every silhouette and texture was hand drawn and digitized. This distinction is crucial for buyers who value authenticity. Hand-drawn vectors possess a organic irregularity that automated tracing tools often miss, giving your designs a human touch that resonates with audiences. The package typically includes 12 PNG files, 2 ABR files (Adobe Photoshop Brushes), 1 AI file (Adobe Illustrator), and 1 EPS file. While this variety seems comprehensive, confusion often arises regarding which file format to use for specific tasks, leading to pixelated prints or uneditable layers.
Misunderstanding File Formats and Scalability
One of the most frequent errors designers make is treating all files in the Antler Vector and PS Brushes pack as interchangeable. It is tempting to grab a PNG because it opens quickly in any viewer, but this can be a costly mistake for print projects. PNGs are raster images, meaning they are made of pixels. If you scale a PNG up for a large banner or a storefront sign, the image will become blocky and lose definition. Conversely, the AI and EPS files are vectors. These use mathematical paths to define shapes, allowing them to be scaled infinitely without any loss of quality.
To avoid this trap, always assess your final output medium before selecting a file. If you are designing for a website, social media post, or a small digital icon, the 12 PNG files included in the download are perfectly adequate and often easier to layer with transparency. However, if your project involves merchandise like t-shirts, vehicle wraps, or large signage, you must utilize the vector files. Open the AI or EPS file in Illustrator or a compatible vector editor. This ensures your antler graphics remain crisp regardless of size. Ignoring this distinction often leads to last-minute panic when a client requests a larger version of a logo, forcing a complete redesign.
Neglecting the Power of Photoshop Brushes
Another overlooked aspect of this toolkit is the potential of the 2 ABR files. Many users download the pack, install the vectors, and completely ignore the brushes. This is a missed opportunity for adding depth and realism to your compositions. Vectors provide the shape, but brushes provide the texture. A common mistake is placing a flat, solid-color antler vector onto a background and calling it done. While clean, this can look sterile and disconnected from the environment.
A better approach involves using the PS Brushes to integrate the vector elements seamlessly. For instance, after placing your antler vector, you can use the included brushes to paint subtle shadows, highlights, or even a distressed overlay that mimics the look of ink or charcoal. This technique is particularly useful for educators creating worksheets, bloggers designing headers, or marketers producing social media ads that need to stand out in a crowded feed. By combining the precision of the vector with the organic feel of the hand-drawn brushes, you create a composite image that feels cohesive and professionally crafted. Remember, the goal is not just to place an image, but to build a scene.
Overlooking Color Customization and Licensing
When working with pre-made assets, there is a tendency to accept the default colors provided in the download. The black silhouettes or standard brown tones found in many clipart packs are safe, but they rarely align perfectly with an existing brand identity. Failing to recolor the Antler Vector elements can make your design look generic, as if it was pulled straight from a free stock site rather than custom-created.
Since these are vector files, changing colors is straightforward and should be part of your workflow. In Illustrator, you can easily shift the fill color to match your brand's hex codes. This simple step transforms a generic asset into a bespoke design element. Furthermore, always verify the licensing terms before commercial use. While the statement "no deer were harmed" speaks to the ethical creation process, it does not automatically define usage rights. Most premium packs allow for commercial use, but it is wise to check if there are restrictions on reselling the files as standalone clipart or using them in logos that will be trademarked. Protecting your business and respecting the creator's terms prevents legal headaches down the road.
Optimizing Your Workflow for Efficiency
Efficiency is key for freelancers and small business owners who manage tight deadlines. A common inefficiency occurs when users do not organize their assets upon download. With 12 PNG files, multiple vector formats, and brush sets scattered in a single folder, finding the right element during a creative crunch can waste valuable time.
Adopt a systematic organization strategy immediately after downloading. Create a dedicated folder for the Antler Vector and PS Brushes collection. Inside, separate the raster images (PNGs) from the vector sources (AI/EPS) and the tool presets (ABR). Install the brushes into Photoshop right away so they are ready for immediate use. When starting a new project, duplicate the master vector file rather than editing the original. This preserves the source material for future projects, ensuring you never have to re-download or reconstruct a base shape. This habit not only saves time but also maintains consistency across different campaigns or product lines.
Ultimately, the value of Antler Vector and PS Brushes extends beyond the files themselves; it lies in how effectively you wield them. By respecting the differences between raster and vector formats, leveraging the textural capabilities of the brushes, and customizing colors to fit your unique vision, you transform simple clipart into powerful design statements. Whether you are a beginner learning the ropes or an entrepreneur polishing your brand image, avoiding these common missteps ensures that your final results are as robust and enduring as the subject matter itself. Take the time to understand your tools, and your designs will reflect that care and professionalism.